Tested with Indigo Vision 19.1
Tested with SightSensor Firmware 16.2.232
Tested with SightTracker PTZ Firmware 17.0.169
(SightSensor HD only tested with Indigo 15.1; earlier version compatibility not guaranteed)
Add SightLogix Devices as an ONVIF Device
Adding Devices with WebConfig
- In WebConfig, go to the Camera tab and set VMS Type to either IndigoVision MPEG4 or IndigoVision H.264 (note that SightSensor HD only provides the H.264 option).
- Click Save and camera will reboot

Adding SightLogix Devices to IndigoVision
- Right-click the site in the Site Explorer and select Add Devices.

- Input the Sensor Info and select Third Party Cameras as Type.

Note that the Name field does not work during the adding procedure. If you want to change camera name:
Add the device
Right click on the device -> Properties
In the Details tab, select “Use Custom Name” and enter new camera name

Note for SightSensor HD: To stream both profiles simultaneously, you have to clone the camera in the control center to show as a second camera in the tree. To do this:
Select the “Add as cloneable” checkbox before adding
Right-click the camera and choose Clone. This creates a second copy of the camera.
You can now right-click the cloned camera, choose properties , choose the “Live Video” tab, and change the streaming profile to profile 1.

Set the Recording to profile 1

How to Enable Recording
To create a continuous recording:
- Highlight the SightLogix device in the site explorer window
- Select the Recording Schedule tab
- Right mouse click to create a new Recording Job

- The New Recording Job window opens. Complete your options and click OK.

- You will see your new Recording Job, as shown.

Alarm Setup Procedure
1. Creating a New Zone
Zones are used to manage alarms. An Alarm server must be accessible before the Control Center can receive an alarm from any SightLogix device.
- Go to the Alarms Explorer tab in the Setup view and right-click a site. Select New Zone...
The New Zone dialog opens

Select the Alarm Server the zone will use.
Select a schedule for the zone. The schedule defines when the zone will be active. If no schedules are available, you will need to create one. Please consult your Control Center manual for details on priority. The priority determines the order in which alarms appear in the Events Window, and how alarms in the zone are escalated.
Click OK.
The new zone is displayed as unset in the Site Explorer.
- Configure the zone alarm to show in the timeline
Right click on the new zone and select “Set”

Set the video source of the zone to the camera to view the alarm on the timeline
Right click on the zone, select Properties -> Video Source -> Enable Video Source
Select your camera

2. Creating a New Detector
Detectors comprise an activation event and a deactivation event. Use the New Detector wizard to create detectors for analytic events for the SightSensor. SightSensors should be already configured and calibrated.
Select the zone you want to add detectors to from the Alarms tab of the Site, right-click, and select New Detector....

The New Detector wizard opens.
Enter a name for the new detector, and select Basic Analytics as the type of event that will activate the detector, and click Next.

Select the camera for this Detector and click Next.

Set the dwell time if necessary and click Next

- Click Finish

Note for SightSensor HD: Repeat the zone and detector steps for the cloned camera.
Verifying Alarms and Alerts
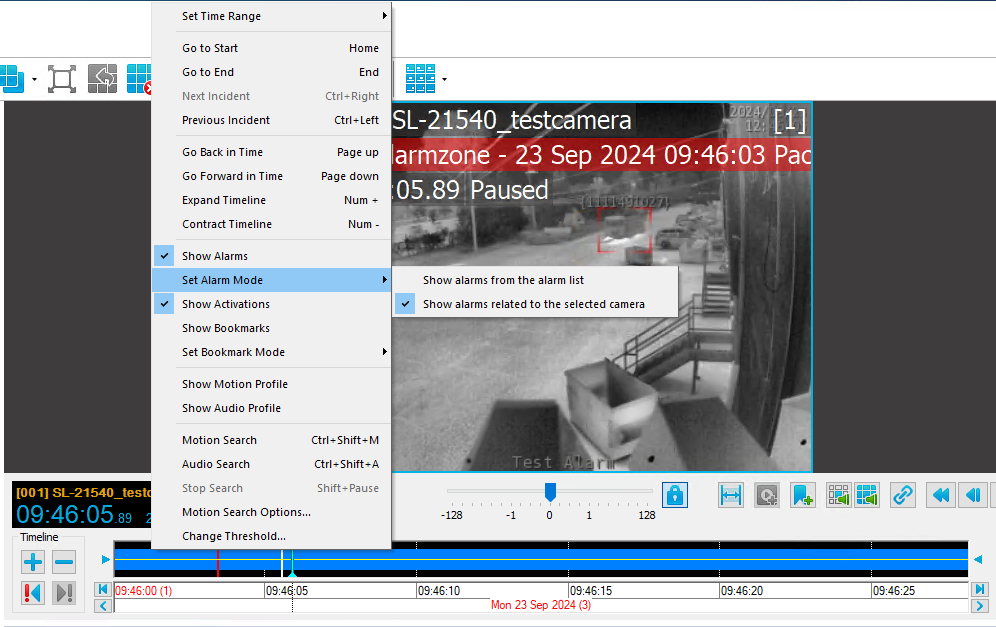
Select the Playback tab in the Site explorer window to review video and alarms. The zone alarm appears as a red line. Camera alarms appear as white lines (detector activations).
Each Zone alarms will appear in the Alarm window.

Right click on the blue timeline and make sure “Show Alarms” is checked.
Right click on the blue timeline and make sure “Show Activations” is checked.
There are several ways to view Zone alarms:
- Right click timeline -> Set Alarm Mode -> “Shows alarms from the alarm list”.
This will show all zone alarms in the timeline.
- Right click timeline -> Set Alarm Mode -> “Shows alarms related to the selected camera”.
This will show alarms on the selected camera. The Zone must be set in order for this to show alarms

You will see the Zone turned red after an alarm occurs in the Alarm Explorer. The detector will be red during an alarm activation.

