WebConfig was designed to make setting up a SightSensor quick and easy. Here's an overview of the features and functions of the WebConfig interface.
Live Camera Snapshot on the Login Page

- When you enter your SightSensor's IP address in your browser, the login page shows the latest snapshot from your camera. This helps you determine which camera you are configuring.
- Refresh the screenshot by clicking the small icon on the bottom left of the image.
Quick Start Guide
After you login for the first time, a Quick Start Guide is displayed showing basic steps to get you up and running.

- Close the window by clicking the “X” in the upper right.
- This pop-up re-opens each time you login until you create your first rule under POLICY.
- Deleting all policy rules will cause the Quick Start to reappear.
Tool Tips
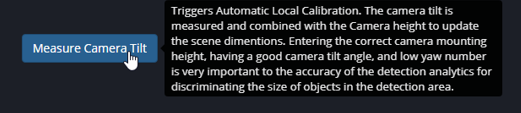
- Hover your mouse over any field name OR field entry for helpful information about the feature and the expected entry format.
Saving Parameters
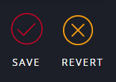
- Entering new parameter(s) brings up the symbol SAVE/REVERT icon under the Page Menu on the left side of the browser window.
- Once parameter(s) are complete click the “SAVE” checkmark circle to load new parameters to the camera.
- To cancel new entry(s) click the “REVERT” X circle and the original entries will be restored.
- Checking either circle will cause
 to appear in the upper right corner to acknowledge the action.
 - Changes made on a field's page but not yet saved are indicated by the yellow text on the left-hand tab:
 to appear in the upper right corner to acknowledge the action.
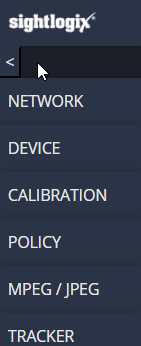
Collapsible Navigation
- You can collapse the left-side navigation menu for more configuration room by clicking the small arrow, as shown (Release 15.8 and later).
One-Click Human Detection Rule
- WebConfig comes with a pre-set policy for detecting human-sized targets. Just click the + icon on the Policy page to create.

- This automatically creates an alarm zone over the entire field of view and an alarm condition for any human-sized object (> than 3 feet tall by > 1 foot wide) moving anywhere within that alarm zone area for longer than ½ second.
- Adjust the zone using the drag points in the corners of the zone overlay. Additional points can be added by left-clicking anywhere along the perimeter of the Zone box, and a drag point can be deleted by right clicking on it.
White Bold and Light Gray Text
White-bold text indicates an editable field. Light-gray text indicates a read-only field.