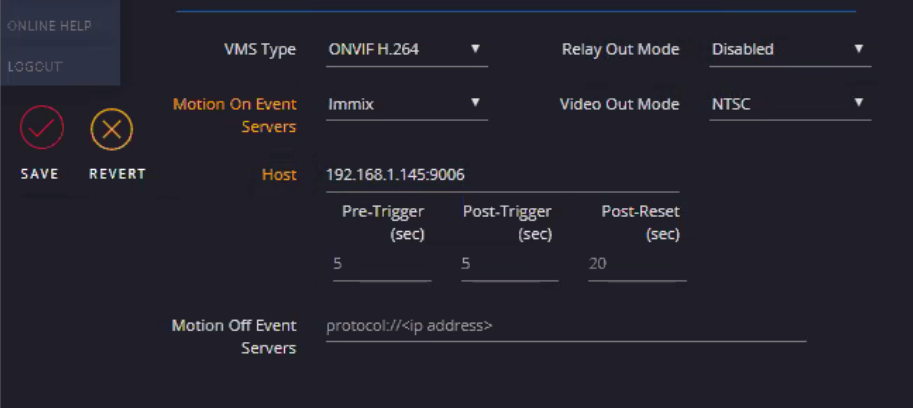
These instructions provide steps for direct connections from SightSensor(s) to Immix using WebConfig.
Requirements
- SightSensor(s) with 15.12.183 or later firmware
- Installation of the Immix ‘SVSightLogixReceiver’ configuration file (Available from Immix: System/System Updates/Available Packages).
- After installation the file can be viewed in the following location: C:\Program Files (x86)\Immix Cloud\SVSightLogixReceiver\.
- An example config file, showing the editable fields in red, is available here.
- There is typically no need to edit the config file as the default settings are optimal. The data points of interest in this config file are:
- "XmlPort" value="9006" – This is the default port the Immix server will listen for SightLogix alarms
- "DecodeLocation" value="false” – By default the pre and post alarm video will populate in the left pane instead of a map of the location. Verify the value is set to false for DecodeLocation
- "ThermalFirst" value="true" – SightSensorHD will send an alarm clip with pre and post video. This clip includes both the thermal video and color HD video. In Immix you will have the option to view either stream in the left pane by choosing from the dropdown.
- After installation the file can be viewed in the following location: C:\Program Files (x86)\Immix Cloud\SVSightLogixReceiver\.
- Access to your router to port forward to each SightSensor through your firewall.
- Refer to a simple Port Forwarding example here ‘Configuring Firewall Rules on Remote Network for Direct Immix Applications’
- The example shows two SightSensors and is scalable.
- Bandwidth: We recommend that your network have a 4 Mpbs minimum upstream bandwidth per camera for best alarm clip delivery.
Finding Your Public IP
Your public IP is usually the IP of your router's internet interface.
The easiest way to find your public IP is to go to ping.eu and the "Your IP is" box will tell you your public IP. If you are behind a router you may also find the IP of the public interface in the router's configuration web page.
It is NOT your computer's current IP address. IP ranges 192.168.*.*, 172.16.*.*10.*.*.* are internal IPs, NOT public IPs.
Testing if a Port is Publicly Visible
You can only test if a port is open to the internet from a PC out on a DIFFERENT network to your own (NOT one within your own LAN)
There are a number of websites that allow you to test if a port is open to the internet, ping.eu is one of them.
- Go to http://www.ping.eu/port-
chk/ - Enter your public IP address (usually the value in the "Your IP is" box is correct, otherwise check your router configuration)
- Enter the port you wish to check, for example 3389 for Remote Desktop, or 80 for the IIS Web Site.
- Click Go.
- The result will be shown. If it says "open" then your port is open to the internet. If it says "closed" then your port is not open and therefore cannot be connected to by others and you will need to check your router settings.
To connect your SightSensor directly to Immix, do the following.
- In a web browser enter the IP address of the SightLogix sensor (default username/password is root/push2edg).
- Click DEVICE on the navigation to open the DEVICE page
- Choose 'Immix' from the 'Motion On Event Servers' drop down menu

- In the Host field, enter the IP Address and port that is listening on the Immix server.
- Enter values for pre and post trigger video that you want to be packaged with the SightLogix alarm and sent to Immix.
- Click Save. (Done!)
- To send a test alarm to Immix press the ‘Alarm Test’ button.
Troubleshooting
Issue: Alarms are received in Immix but without associated video.
Solution:
- Ensure that you are using firmware 15.12.183 or later.
- Shorten the video clip length by adjusting the pre and post trigger time on the Device page of WebConfig to a lower value.
- The default is 5 seconds pre and 5 seconds post.
- Set this lower, for example, 2 seconds each.
- Lower clip video parameters:
- Go to the MPEG/JPEG link in WebConfig
- Lower detect/non-detect bitrate to 0.75 mpbs (7500000)
- Lower detect/non-detect framerate and iframe interval to 4
- To check Realized Upload bandwidth:
- Go to Device link in WebConfig and click "Clip Bandwidth Stats" which will open a windows with content similar to the image below (hover over Clip Bandwidth Statistics" of the window for tooltip explanations):

Can I use a VMS to connect to Immix instead?
Some installers may choose to connect their SightSensors to a supported VMS first, which then connects to Immix. This does eliminate the need to create port forward rules on your router. However, because VMS systems handle their integration to Immix in different ways, you may lose some compelling features unique to the SightLogix/Immix integration, including:
- SightSensors that directly connect to Immix can package an alarm with configurable pre and post video (including thermal and color HD). Your VMS may or may not provide this functionality.
- In parallel with the alarm, Immix users can simultaneously view live thermal video over RTSP (for SightSensor HD, they can view both thermal and visible live streams). If using a VMS, they will take our Onvif stream and may or may not be able to provide this functionality.
